There are many ways for you to get the best video quality in your work. It depends on so many factors such as the amount of light within a setup, techniques and the gear you use. To add, there are some key camera terms that you must know if you are to get your video looking like the professionals. Inside Gulf Coast State College’s Digital Media program, the student can use and check out many forms of camera equipment to help with their video needs. However, using the equipment isn’t the only cornerstone to helping you become the videographer you are looking for. You must also understand the settings within the camera to bring the best quality out of your video and photographs. I will break down some important knowledge so that the best camera, video and photography settings will finally be revealed.
Light is such an important part of videography and photography. There are many ways to light a set and subject. One method you can use is practical lighting. This form of lighting is utilizing the existing light within an environment to help light the actor, actress or scene. Before I get into the more technical aspects of lighting, lets understand lighting as a way for you to manipulate objects. If I want a ball to have a feeling of loneliness and despair, I would light it with a fluorescent bulb. This is around 5000k, which is a numbering system used for measuring light. So, color temperature affects how the object looks and the tonal mood for the scene. This is a key part of videography because you must know the temperature of light being emitted. You may not know its 5200k, but you can guess the temperature of color and know if it is correct or not for a scene. Furthermore, most beginners forget to white balance. White balancing is a method for correctly lighting a scene’s color temperature so that it can have the best realistic interpretation of what you are looking at. I suggest doing this once you turn your camera on. The reason why this is important is because in post, a yellow video may be hard to correct without losing some of the technical information within the video. This will in term reduce the quality of the video and this post is all about getting the best quality. Along the same lines, make sure white balancing is set up correctly on your camera before shooting. I advise as well to read up on the temperatures of lighting so that you can get the best manipulation for lighting a scene.
ISO
There is one setting you must know when you are trying to obtain great quality in your video. That setting is entitled ISO. It stands for International Standards Organization. Rather than bog you down with definitions, know that ISO deals with the sensitivity to light. The location varies on different cameras but it does the same thing on all of them. ISO controls the affects of light by making your camera sensitive to how it is coming into the camera. Many beginners raise the ISO to 800 or 1600 when shooting in bright light. Always keep your ISO down as low as it can go when shooting in bright light. This will add better quality to your video. I estimate around 100-200 for your ISO setting. During nighttime scenes, you could increase it to 1600 if need be. Most DSLR’s on todays market allow you to increase it very high and still maintain quality. I increase my camera up to 1600 because some fragments will start to appear if you blow it up big enough. The better option is to add more light to the scene if it is dark. For my camera in about the mid afternoon, I would increase it to 400. Remember, these are only estimates. Every scene is different, and you must keep in account your environment before you settle in on a number.
YouTube Video courtesy of Tony & Chelsea Northrup
SHUTTER SPEED
Shutter speed is one of the most elusive terms that people forget in videography. It is simply the time the camera’s shutter is open to capture the light going into the camera. The longer it is open, more light goes in. The shorter it is open, the less light that goes in. That’s how I remember the term. There are more technical variations, but this post is about being aware of how it affects video quality, so I will keep it simple. It’s measured in fractions of a second. As a base for capturing movement, put your shutter speed around 1/250 of a second. According to how fast the subject is moving, increase it up from there. However, remember that fast shutter speeds do not control lighting. Make sure the scene is nicely lit because the faster the shutter speed, the less light that can go into the camera.
LENS
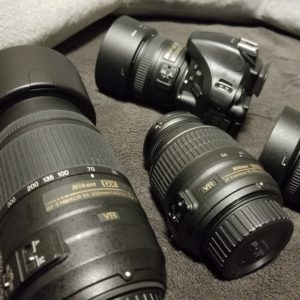
The lens is also very important, it will be discussed later in another post. For now, I will say that a 50mm lens mimics the sight of the eye. Anything below that is a wide-angle lens such as a 35mm and below that is a super wide-angle lens. Just know that the f- stop on a lens determines the amount of light that goes into your camera. As a beginner, if you are looking for an expensive lens as a first purchase, get a 50mm. it does a lot for the accommodation of different scenes you shoot such as portraits, wildlife and sports. In terms of video, it is perfect for most occasions as well. I personally use my 50mm almost entirely, the reason why is because in low light, it brightens a scene very well because it reduces the amount of tinkering to your settings to make the scene lit well. Telephotos are nice as well. The ideal telephoto lens that I can’t wait to get my hands on is the (EF 70-200mm f/2.8L). It is very expensive but like I said in an earlier post, this career path after the basics is having the best gear for the job. What makes it so special is the aperture of 2.8. This means that tons of light go into the camera, which improves the quality of the image. Once again, do not bog yourself down on these settings, just know that the lens does make images better and you should at least invest into one when you get the funds. It is an incredible upgrade in quality from the kit lens provided with DSLR’s.
APERTURE
We mentioned F-stops earlier, aperture is measured in it and it is also what allows the amount of light to enter your camera. F-stops is a hole in the camera, the bigger the hole, the more light that goes into the camera such as a f/2.8. The smaller the hole, the less light that goes into the camera, such as an f/22. This is the reason why investing in the right lens is important because if you get a lens that doesn’t allow much light into the camera, the more you must compensate for it by adjusting the controls such as the ISO or shutter speed to make it work.
MANUAL SETTINGS
The last way to get the best quality out of your camera and shoot the best video or photo possible is to use manual settings. People steer away from this setting because it requires you to know your camera. You must fine tune all the settings of the camera to get the quality for the scene. Trusting auto settings works very rarely. The auto adjust feature does an adequate job but when following a subject, it changes (DOF) depth of field in unusual ways at times, which reduces the quality of the image. It is best to shoot in manual so that you have full control of the camera and the scene you are shooting.
I hope this give you a run down of some of the major features of getting your camera to shoot and record the best image and video possible for your camera. Knowing the settings of ISO, shutter speed, aperture and manual settings will allow you to get the most out of your camera. Within the Digital Media program, there are many cameras that you can use to practice with to get accustomed to operating the more technical features associated with a camera. There are camcorders you can check out, but I would suggest joining in on some shooting events around the campus for a better feel on camera usage without having to break your bank. The Digital Media program also offers classes that deal with shooting video such as Studio Production. Whichever method you use to learn the settings, learn it because it affects how an image look and the quality of the image. After all, videography is an art and with every career, the more you know, the farther you go.
About The Author

Perry Ellis
Student - Spring 2018